- published
Dynamic Pipelines in GitLab
- authors
Static pipelines are simple enough for processes whose requirements will not change dramatically over time. You should not be starting your Continuous Integration / Continuous Delivery (CI/CD) with a dynamic pipeline unless you necessarily need it. Always follow the “You Aren’t Gonna Need It” (YAGNI) principle.
Use Case
Working on the Serverless team at Datadog, I encountered multiple release workflows which were not automated. The decision at the time was that there was no incentive in allotting engineering hours into something our runbook allowed us to do perfectly fine. Until the problems arised – a couple of times I must say.
Let me explain to you how to create a dynamic pipeline. We will be using my team’s use case as a reference. Although, I will simplify it for the sake of this blog.
We needed to build a project with multiple runtimes. Integration tests also had to follow this rule. Parallel matrices were not an option since for N runtimes, we had to wait for the N jobs, and it was not really parallelizing the work.
Creating a Dynamic Pipeline
To create a dynamic pipeline in GitLab, you will need three key things: to define a job whose sole purpose is generating the desired pipeline; you will also need the data to use dynamically; and, the template which the generator job will use.
I have chosen gomplate, a template renderer framework in Go, which will allow us to simplify the process. First, let's define our inputs, outputs, and data in a configuration file.
Configuration
The configuration will be the entry point for gomplate. It has to be written in YAML. For a simple use case, define the inputFiles, outputFiles, and datasources.
# ci/config.yaml

inputFiles:
  - ci/input_files/dynamic-pipeline.yaml.tpl  # our template will live here

outputFiles:
  - ci/dynamic-pipeline.yaml                  # this is the output pipeline to run

datasources:
  runtimes:
    url: ci/datasources/runtimes.yaml         # our desired runtimes to run
  environments:
    url: ci/datasources/environments.yaml     # on sandbox and prod
  regions:
    url: ci/datasources/regions.yaml          # we later want to publish on this specified regions
The input files will include your template, or templates; the output files specify the path of the command’s output; and the datasources are the dynamic values which will be used in the template.
Datasources
Gomplate supports multiple datasources, here, we will use a local file defined in YAML.
# ci/datasources/runtimes.yaml

runtimes:
  - name: "node16"
    node_version: "16.14"
    node_major_version: "16"
  - name: "node18"
    node_version: "18.12"
    node_major_version: "18"
  - name: "node20"
    node_version: "20.9"
    node_major_version: "20"
# ci/datasources/regions.yaml

regions:
  - code: "us-east-1"
  - code: "us-east-2"
  - code: "us-west-1"
  - code: "us-west-2"
# ci/datasources/environments.yaml

environments:
  - name: sandbox
  - name: prod
Template
The template is the most important part, since it will be the base of every dynamic job you create. A template can access any specified datasource in the configuration.
In the template below, we define three stages, which will run for every element in the runtimes datasource. In the publish stage, it will create two jobs per environment: sandbox and prod. In this same stage, we do want to use a matrix, since it’s our last state, and nothing depends on it.
# ci/input_files/dynamic-pipeline.yaml.tpl

stages:
 - build
 - test
 - publish

# for every runtime, we want to create multiple jobs
{{ range $runtime := (ds "runtimes").runtimes }}

build  ({{ $runtime.name }}):
  stage: build
  image: node:{{ $runtime.node_major_version }}-bullseye
  artifacts:
    paths:
      - .dist/build_node{{ $runtime.node_version }}.zip
  script:
    - NODE_VERSION={{ $runtime.node_version }} ./scripts/build.sh

integration-test ({{ $runtime.name }}):
  stage: test
  image: node:{{ $runtime.node_major_version }}-bullseye
  needs:
    - build  ({{ $runtime.name }})
  dependencies:
    - build  ({{ $runtime.name }})
  script:
    - RUNTIME_PARAM={{ $runtime.node_major_version }} ./ci/run_integration_tests.sh

# for every environment, we want to create two publishing jobs
{{ range $environment := (ds "environments").environments }}

publish {{ $environment.name }} ({{ $runtime.name }}):
  stage: publish
  image: docker:20.10
  needs:
      - build  ({{ $runtime.name }})
      - integration-test ({{ $runtime.name }})
  dependencies:
      - build  ({{ $runtime.name }})
  parallel:
    matrix:
      - REGION: {{ range (ds "regions").regions }}
          - {{ .code }}
        {{- end}}
  script:
    - STAGE={{ $environment.name }} NODE_VERSION={{ $runtime.node_version }} ./ci/publish.sh

{{- end }} # environments range

{{- end }} # runtimes range
Generator Job
Finally, you need to define the job which will generate your pipeline.
# .gitlab-ci.yml

stages:
  - generate
  - run

generate-pipeline:
  stage: generate
  image: golang:alpine                  # using a light golang image
  script:
    - apk add --no-cache gomplate       # installing gomplate
    - gomplate --config ci/config.yaml  # running with specified configuration
  artifacts:
    paths:
      - ci/dynamic-pipeline.yaml        # pass the pipeline to the next job

execute-dynamic-pipeline:
  stage: run
  trigger:
    include:
      - artifact: ci/dynamic-pipeline.yaml
        job: generate-pipeline
    strategy: depend
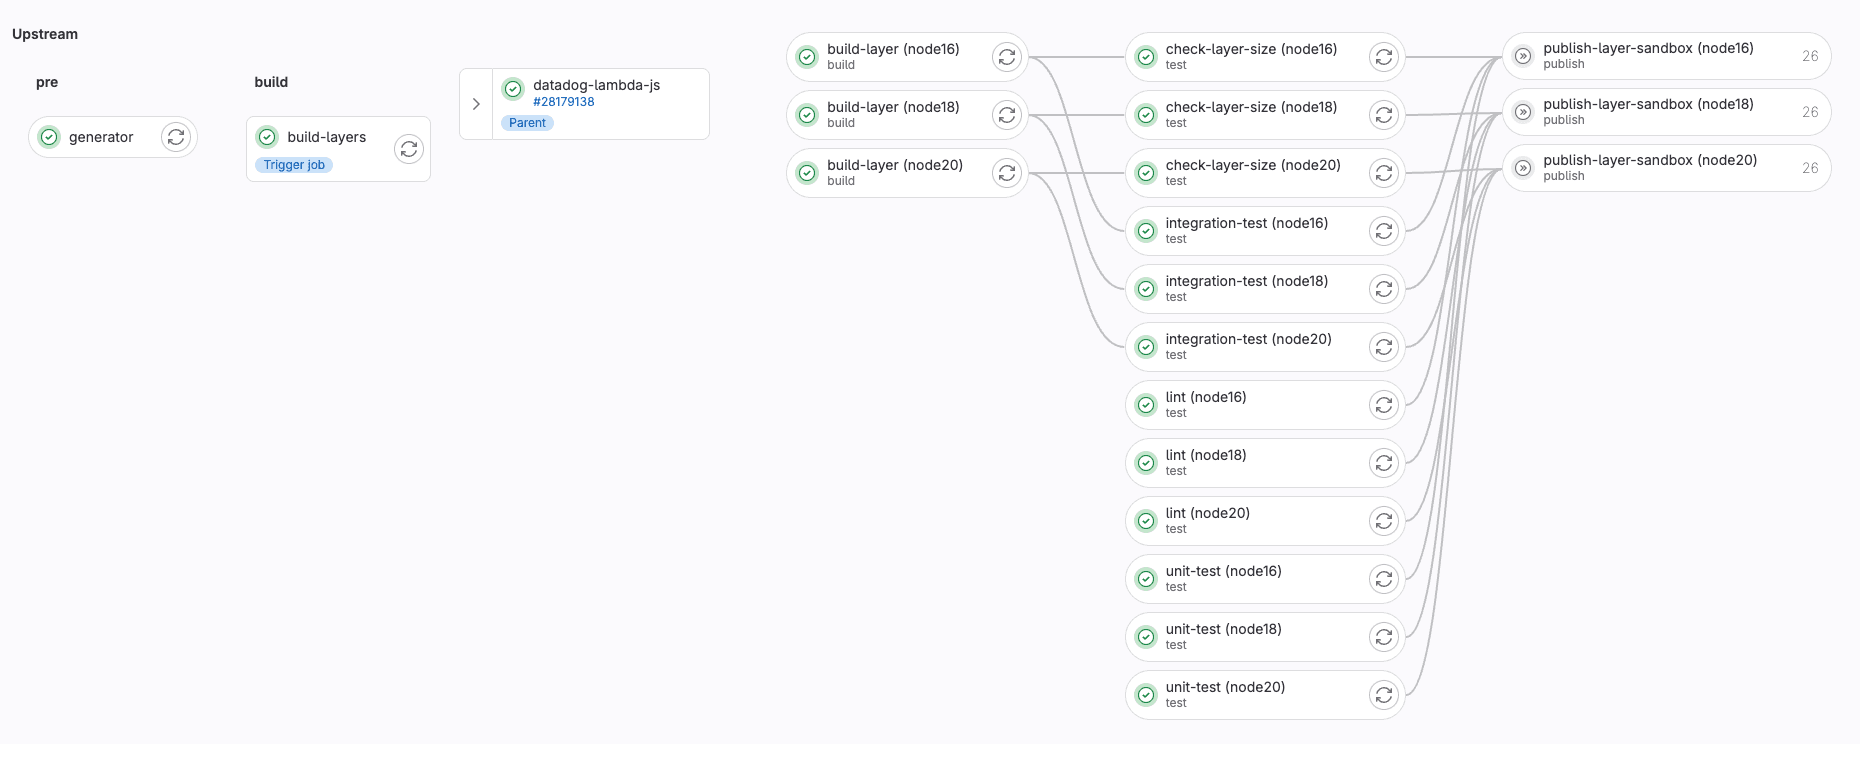
Pipeline in GitLab
In our use case, the pipeline will execute on every merge request. The generated pipeline will be a downstream pipeline which will be triggered after the generator job has been completed.
